
Shore hardness of plastics: scales, typical values and limits
Shore hardness is the most common figure used to describe the hardness impression of plastics and elastomers. In data sheets, drawings and test reports you will encounter it as Shore A 70 or Shore D 60 – what the value actually means, and when it is reliable, often remains unclear.
This article explains how Shore hardness of plastics is measured, which standards apply, how Shore A and Shore D relate, and why testing on the finished part reaches its limits. For design and quality assurance, this provides a sound basis for material selection, incoming inspection and comparative measurements on reference parts.
Fundamentals: what is Shore hardness?
Shore hardness describes the indentation hardness of a material. It is measured with a durometer, a standardised test instrument that presses a spring-loaded indenter onto the material surface with a defined force. The hardness value is derived from the indentation depth: 100 Shore corresponds to 0 mm indentation depth, 0 Shore to 2.5 mm. The deeper the indenter penetrates, the softer the material and the lower the Shore value.
The classification matters: Shore hardness is not a quality characteristic, but an indicative figure for the hardness impression. It makes materials comparable on the question of “hard or soft” – nothing more.
Other properties cannot be derived from Shore hardness: tensile strength, elongation at break, recovery behaviour, abrasion resistance and temperature resistance each require their own tests. Anyone reading Shore A 70 knows the hardness impression, not the property profile of the material.
Standards and test methods for Shore hardness
Shore hardness testing is a standardised static test method that operates in the macro range with a test force of 3.924 to 50 N. Three standards appear most frequently in data sheets and specifications:
- ISO 48-4 describes the hardness of vulcanised and thermoplastic rubber and defines four scales. It replaces the withdrawn ISO 7619-1.
- ASTM D2240 covers a broader material range – from elastomers through cellular and gel-like materials to plastics – and comprises twelve scales. It is used mainly in North America.
- ISO 868 governs the indentation hardness of plastics and ebonite by the Shore method and refers explicitly to the Shore A and Shore D scales.
The difference between the scales lies in the indenter: Shore A uses a truncated cone and is applied to softer plastics, elastomers and rubber. Shore D uses a pointed cone with a rounded tip and is used for hard plastics and stiffer elastomers. Further scales such as Shore B, C, 0, 00, 000 and D0 as well as Micro-Shore and VLRH exist for special cases.
Because the methods differ in indenter, spring force and contact force, values from different scales cannot be converted into each other. They can only be correlated – the transition lies at around Shore A 90 to Shore D 50.
The main test conditions compared:
| Parameter | ISO 48-4 | ASTM D2240 |
|---|---|---|
| Specimen thickness | at least 6 mm | at least 6 mm |
| Stacking of thin specimens | permitted (three layers) | permitted |
| Number of measurements | 5, mean from these | 5, mean or median from these |
| Indent spacing | at least 6 mm from each other, at least 12 mm from the specimen edge | at least 6 mm from each other, at least 12 mm from the specimen edge |
| Reading time | 3 s for vulcanisates, 15 s for TPE | 1 s after firm contact |
| Contact force | 1 kg for Shore A, 5 kg for Shore D | 1 kg |
| Conditioning before test | at least 1 h at 23 °C ± 2 °C | as per standard |
If the prescribed reading time is exceeded or undershot, it must be stated together with the measured value – for example “54 Shore A 15 s”. Without this addition, values from different tests are not comparable.
Implications: when Shore values are reliable
Specimen geometry: thickness, edge distance, curved surfaces
The specimen must be thick enough, typically at least 6 mm. If it is thinner, the instrument also measures the hard support; this effect is called the anvil effect and produces values that are too high. Stacking several thin specimens is often permitted by the standard, but yields less accurate results than a homogeneous specimen.
The distance from the specimen edge must be at least 12 mm. If you measure closer to the edge, the material yields sideways and the value comes out too soft.
Durometers require a flat support surface. On cylindrical or uneven parts – O-rings, for example – the presser foot does not sit flush, which distorts the results considerably.
Material behaviour: creep and fillers
Plastics and rubber are viscoelastic: they flow under pressure. The measured value therefore drops immediately after the instrument is applied. If the value is not read exactly after the prescribed time, the result is not comparable.
In composites and highly filled plastics, the needle may randomly hit a hard particle such as a glass fibre or a soft matrix region. The result is high scatter between individual measurements.
Environment and handling: temperature and contact pressure
The hardness of polymers is strongly temperature-dependent. Even small deviations from the standard test temperature of 23 °C change the result considerably; humidity has an additional effect.
With handheld durometers, the result depends on the operator. If the instrument is applied too quickly, at an angle or with too much force, measurement errors occur. Reliable values require a test stand with a defined loading weight.
Scale limits: unreliable below 10 and above 90
The Shore scale runs from 0 to 100, but is only precise in the middle range. Values below 10 and above 90 are considered inaccurate. In these border ranges you change the scale – from Shore A to Shore D for hard materials, to Shore 00 for very soft gels.
Typical values: Shore A and Shore D compared
Shore A and Shore D overlap in a transition range. Because both scales are precise only in their middle range, the hard range is purely a Shore D domain and the soft range a Shore A domain – you need both values only in the middle. The following overview places the scales and shows where typical applications lie:
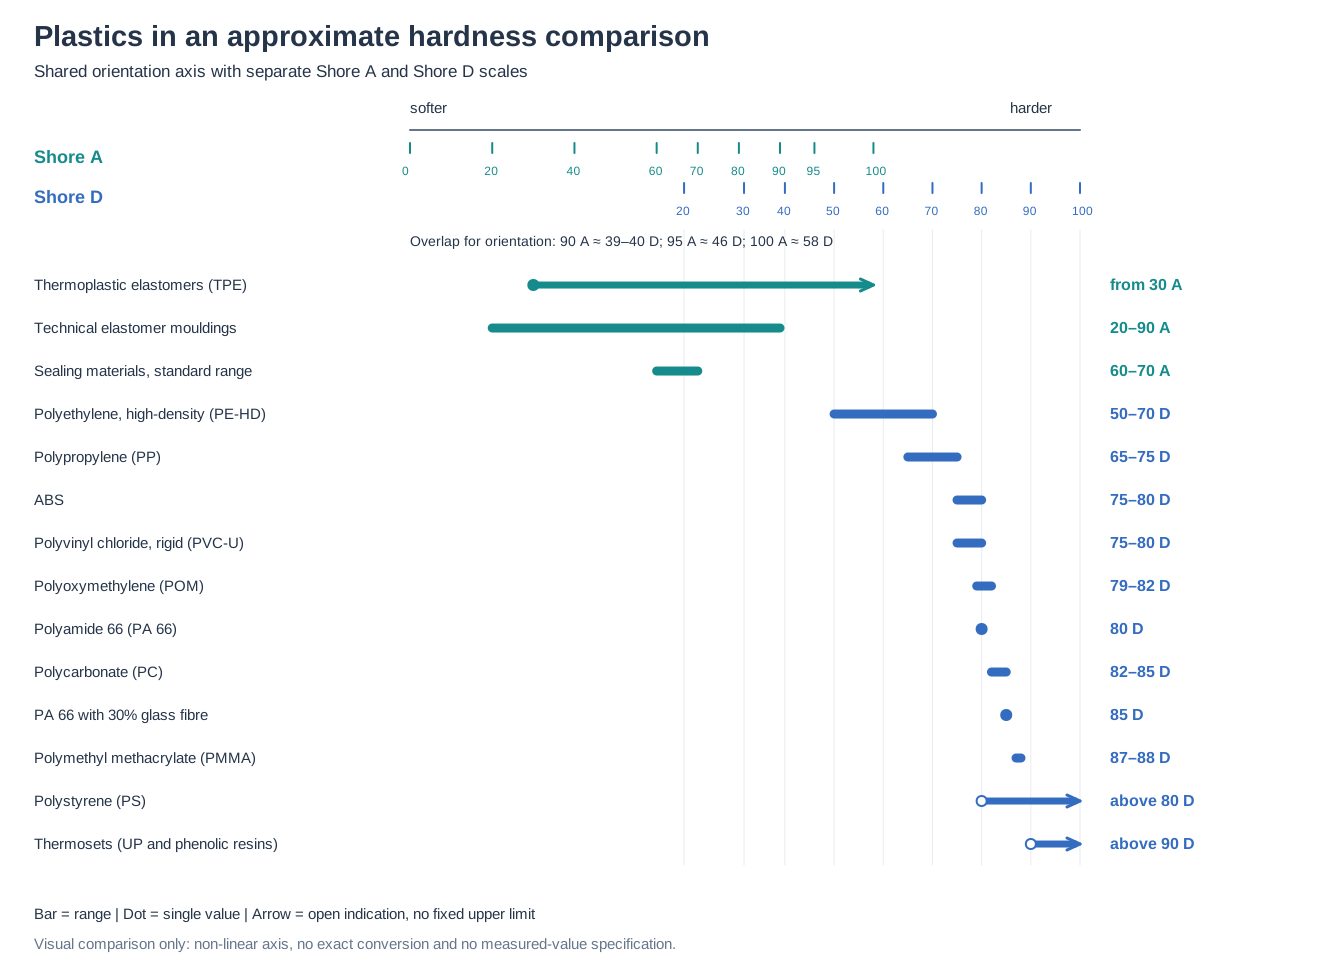
Between Shore D 42 and Shore D 60 both scales overlap: in this range Shore A and Shore D provide comparable statements. Above and below that, only one scale is reliable – which is why values cannot be converted, only correlated.
Three patterns stand out: glass-fibre reinforcement raises the hardness – polyamide 66 with 30% glass fibre lies at around Shore D 85 instead of 80. Fillers shift values within one grade so strongly that a single data-sheet value never stands for an entire material group. And thermosets lie above Shore D 90 at the edge of the scale; there the durometer is at the end of its resolution.
The correlation is a guide, not a standard table. For design, drawings and specifications, the material manufacturer’s data sheets and the agreed test standard apply.
Procedure: how to test Shore hardness correctly
- Clarify the question. Define what the measured value is intended to demonstrate: material identification, control of an in-house compound, comparison with a reference part, or release of a batch.
- Specify standard and scale. Choose ISO 868, ISO 48-4 or ASTM D2240 and decide between Shore A and Shore D based on the expected hardness range.
- Secure the test conditions. Measure at 23 °C ± 2 °C and condition the specimen for at least one hour under these conditions.
- Prepare the specimen. Ensure a thickness of at least 6 mm, a flat support surface and an edge distance of at least 12 mm.
- Carry out the measurement. Work with a test stand or durometer, observe the prescribed reading time and take five measurements at different locations.
- Document the result. Record hardness value, scale, reading time, mean or median and the scatter of the individual values – for example “54 Shore A 15 s”.
In practice, the minimum requirements for an objective test on the real part are often not met: wall thicknesses that are too thin, curved surfaces, parts taken straight from production without conditioning. A standard-compliant absolute statement is then not possible. Comparative measurement has proved a reliable alternative: you release a reference part, measure it and the series parts under identical conditions, and assess the deviation instead of an absolute value. In this way you use Shore hardness as process and incoming inspection, for example with in-house compounds.
Practical tips
For design and development
- Always request Shore hardness with scale and test standard, for example “Shore A 70 to ISO 868” – not as a bare number.
- Check whether further properties besides hardness are function-critical: recovery behaviour, abrasion, temperature resistance.
- Use hardness as an entry point into material selection, not as the sole selection criterion.
For quality assurance and incoming inspection
- Document test conditions in full: standard, scale, reading time, temperature, mean and scatter.
- For in-house compounds, define an approved reference part and measure comparatively under identical conditions.
- Take five individual values and watch the scatter. Large deviations indicate fillers, air inclusions or an uneven mix.
- Do not report values below 10 or above 90 as an absolute value; change the scale or document the limitation.
Checklist
- Test standard and scale defined before measurement and stated in the report
- Reading time observed and documented (e.g. “54 Shore A 15 s”)
- Specimen thickness at least 6 mm, flat support, edge distance at least 12 mm
- Measurement at 23 °C ± 2 °C, specimen conditioned for at least 1 h
- Five measurements, mean or median and scatter stated
- No absolute statement below Shore 10 or above Shore 90
- For in-house compounds: approved reference part and identical measurement conditions
Next step
If you want to include Shore hardness as a test characteristic in a drawing, specification or incoming inspection, agree the standard, scale and measurement conditions together with your manufacturing partner. More on securing test characteristics and measurement strategies is available under Quality in injection moulding, and on transferring them into drawing notes under Injection moulding tolerances to DIN ISO 20457. For a specific part you are welcome to send us a project enquiry.
FAQ
What does Shore hardness mean for plastics?
Shore hardness describes the indentation hardness of a material, measured with a durometer. The deeper the standardised indenter penetrates the surface under a defined force, the softer the material and the lower the Shore value. It is an indicative figure for the hardness impression, not a quality characteristic.
What is the difference between Shore A and Shore D?
Shore A is measured with a truncated cone and is the standard scale for soft plastics, elastomers and rubber. Shore D uses a pointed cone and is intended for hard plastics and stiffer elastomers. The scales cannot be converted into each other, but they overlap in the range around Shore A 90 to Shore D 50.
Why does the measured Shore value differ from the data sheet?
Common causes are a specimen that is too thin, an uneven support, insufficient edge distance, a different reading time, or a test temperature far from 23 °C. Handheld durometers without a test stand also produce scattered values. For comparable results, all conditions of the chosen standard must be observed.
Can Shore hardness be measured on the finished part?
A standard-compliant absolute measurement is often not possible on the part because thickness, flatness and edge distance are insufficient. Comparative measurement has proved effective: an approved reference part and the series parts are tested under identical conditions, and the deviation is assessed. This works well as process and incoming inspection.
How soft is TPE in Shore A?
Thermoplastic elastomers typically start from around Shore A 30 upwards. Below that, parts become too compliant for many technical applications. For design, the material manufacturer's data-sheet value under the stated test standard applies.
Ready for your next project?
We support you with material selection, toolmaking and series production – with personal advice and technical expertise.
Discuss your projectRelated services
Related articles
Design for injection moulding
A practical guide for designers on how to develop plastic parts from the outset in a material- and process-appropriate way for injection moulding.
Injection moulding tolerances to DIN ISO 20457
An overview of tolerances and acceptance conditions to DIN ISO 20457 and their application in plastic injection moulding.